Showing posts with label Pembuatan Video Dokumentasi. Show all posts

Saturday, December 1, 2012

Standard Format Video Menggunakan CamStudio dan Compressor Xvid

CamStudio adalah sebuah software open source yang sanggup untuk merekam aktivitas di layar dan suara pada laptop atau komputer kita.

Di sini saya memberikan tutorial pengaturan Standard Format Video Menggunakan CamStudio dan Compressor Xvid. Berikut settingannya:

MENU REGION
  1. Fixed Region
    • unchecked "Fixed Top-Left Corner" & "Drag Corners to Pan"
    • Resolusi: Width x Height = 426 x 240

MENU OPTIONS
  1. Video Options
    • Compresor: Xvid MPEG-4 Codec
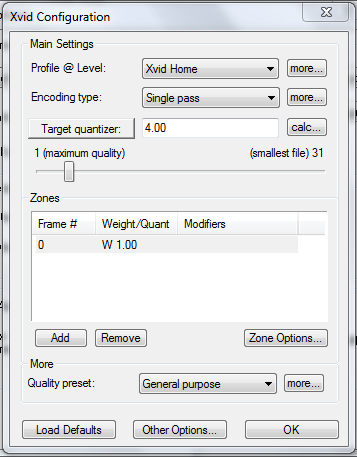
    • Compressor -> Configure -> Other options -> Encoder -> Unchecked "Display encoding status"
    • Uncheck: Auto Adjust
    • Set Key Frames Every = 20 frames
    • Capture Frame Every = 50 milliseconds
    • Playback Rate = 20 frames/second
  2. Cursor Options
    • Cursor Display #
    • Cursor Highlight #
  3. Audio Options for Microphone
    • Audio Capture #
    • Recording Format -> 11.025 kHz, mono, 8-bit
    • Interleave every: 100 Milliseconds
    • Unchecked "Use MCI Recording"
  4. Pilih: Record audio from microphne
  5. Pilih: Enable Autopan

MENU TOOLS
  1. Pilih: Video Annotations
    • Klik Kanan -> Video Format -> Resolution = 160 x 120
    • Klik Kanan -> Edit Text: kosongkan/ hapus teks yang tertulis

Untuk lebih jelasnya, silahkan lihat video ini.


Monday, November 5, 2012

How to use camstudio

Dear Lecturer
Name: Him Seanghon
Mayor: D4 TMD Batch6

This is my video about how to use camstudio from youtube


This is my link :  http://youtu.be/_tQPnHITP_I

Thanks.

Tuesday, October 23, 2012

Video How to use Camstudio Recorder

Name: Om chanlyta
Major:  TMD D4 ITB Batch 6

========
Software:
CamStudio dan XVid Video Codec

========
--Format Video--

REGION
1. Fixed Region
    > unchecked "Fixed Top-Left Corner" & "Drag Corners to Pan"
    > Resolusi: Width x Height = 426 x 240

OPTIONS
1. Video Options
    > Compresor: Xvid MPEG-4 Codec
    > Compressor -> Configure -> Other options -> Encoder -> Unchecked "Display encoding status"
    > Uncheck: Auto Adjust
    > Set Key Frames Every = 20 frames
    > Capture Frame Every = 50 milliseconds
    > Playback Rate = 20 frames/second
2. Cursor Options
    > Cursor Display #
    > Cursor Highlight #
3. Audio Options for Microphone
    > Audio Capture #
    > Recording Format -> 11.025 kHz, mono, 8-bit
    > Interleave every: 100 Milliseconds
    > Unchecked "Use MCI Recording"
4. Pilih: Record audio from microphne
5. Pilih: Enable Autopan

TOOLS
1. Pilih: Video Annotations
    > Klik Kanan -> Video Format -> Resolution = 160 x 120
    > Klik Kanan -> Edit Text: Klik Kanan


This is my link.
http://www.youtube.com/watch?v=xsapwf1VSD4&feature=youtu.be


Monday, October 22, 2012

How to record screen by Camstudio

Name: Chea Lida
Major: TMD D4 ITB Batch 6


========
Software:
CamStudio dan XVid Video Codec

========
--Format Video--

REGION
1. Fixed Region
> unchecked "Fixed Top-Left Corner" & "Drag Corners to Pan"
> Resolusi: Width x Height = 426 x 240

OPTIONS
1. Video Options
> Compresor: Xvid MPEG-4 Codec
> Compressor -> Configure -> Other options -> Encoder -> Unchecked "Display encoding status"
> Uncheck: Auto Adjust
> Set Key Frames Every = 20 frames
> Capture Frame Every = 50 milliseconds
> Playback Rate = 20 frames/second
2. Cursor Options
> Cursor Display #
> Cursor Highlight #
3. Audio Options for Microphone
> Audio Capture #
> Recording Format -> 11.025 kHz, mono, 8-bit
> Interleave every: 100 Milliseconds
> Unchecked "Use MCI Recording"
4. Pilih: Record audio from microphne
5. Pilih: Enable Autopan

TOOLS
1. Pilih: Video Annotations
> Klik Kanan -> Video Format -> Resolution = 160 x 120
> Klik Kanan -> Edit Text: kosongkan/ hapus teks yang tertulis


Friday, October 19, 2012

Konfigurasi CamStudio

Salam.. Pada Kesempatan ini saya akan menerangkan bagaimana melakukan setting konfigurasi recording pada cam studio.

Tutorial Cara Konfigurasi Menggunakan CamStudio

Video Tutorial Cara Konfigurasi menggunakan CamStudio.


Competency Progress: How to record screen on your PC?

Dear, Lecturer
Name: Sean Vandet
Major: TMD D4 ITB Batch 6

========
Software:
    - CamStudio
    - XVid Video Codec

========
--Format Video--

REGION
1. Fixed Region
    > unchecked "Fixed Top-Left Corner" & "Drag Corners to Pan"
    > Resolusi: Width x Height = 426 x 240

OPTIONS
1. Video Options
    > Compresor: Xvid MPEG-4 Codec
    > Compressor -> Configure -> Other options -> Encoder -> Unchecked "Display encoding status"
    > Uncheck: Auto Adjust
    > Set Key Frames Every = 20 frames
    > Capture Frame Every = 50 milliseconds
    > Playback Rate = 20 frames/second
2. Cursor Options
    > Cursor Display #
    > Cursor Highlight #
3. Audio Options for Microphone
    > Audio Capture #
    > Recording Format -> 11.025 kHz, mono, 8-bit
    > Interleave every: 100 Milliseconds
    > Unchecked "Use MCI Recording"
4. Pilih: Record audio from microphne
5. Pilih: Enable Autopan

TOOLS
1. Pilih: Video Annotations
    > Klik Kanan -> Video Format -> Resolution = 426 x 240
    > Klik Kanan -> Edit Text: How to use CamStudio?
Link on the youtube:
 http://www.youtube.com/watch?v=WU70rO1pdHc&feature=youtu.be


How to use Cam Studio Recorder.

Name: Chroeng Soklay
Major: TMD D4 ITB Bactc6

========
Software:
CamStudio dan XVid Video Codec

========
--Format Video--

REGION
1. Fixed Region
    > unchecked "Fixed Top-Left Corner" & "Drag Corners to Pan"
    > Resolusi: Width x Height = 426 x 240

OPTIONS
1. Video Options
    > Compresor: Xvid MPEG-4 Codec
    > Compressor -> Configure -> Other options -> Encoder -> Unchecked "Display encoding status"
    > Uncheck: Auto Adjust
    > Set Key Frames Every = 20 frames
    > Capture Frame Every = 50 milliseconds
    > Playback Rate = 20 frames/second
2. Cursor Options
    > Cursor Display #
    > Cursor Highlight #
3. Audio Options for Microphone
    > Audio Capture #
    > Recording Format -> 11.025 kHz, mono, 8-bit
    > Interleave every: 100 Milliseconds
    > Unchecked "Use MCI Recording"
4. Pilih: Record audio from microphne
5. Pilih: Enable Autopan

TOOLS
1. Pilih: Video Annotations
    > Klik Kanan -> Video Format -> Resolution = 160 x 120
    > Klik Kanan -> Edit Text: kosongkan/ hapus teks yang tertulis


http://youtu.be/JgrQWBcgB2w

This is my video show about how to use Cam Studio Recorder.
Thank you!

how to use camstudio

Dear, Lecturer
Name: Him Seanghon
Major: TMD D4 ITB Batch 6

========
Software:
CamStudio dan XVid Video Codec

========
--Format Video--

REGION
1. Fixed Region
    > unchecked "Fixed Top-Left Corner" & "Drag Corners to Pan"
    > Resolusi: Width x Height = 426 x 240

OPTIONS
1. Video Options
    > Compresor: Xvid MPEG-4 Codec
    > Compressor -> Configure -> Other options -> Encoder -> Unchecked "Display encoding status"
    > Uncheck: Auto Adjust
    > Set Key Frames Every = 20 frames
    > Capture Frame Every = 50 milliseconds
    > Playback Rate = 20 frames/second
2. Cursor Options
    > Cursor Display #
    > Cursor Highlight #
3. Audio Options for Microphone
    > Audio Capture #
    > Recording Format -> 11.025 kHz, mono, 8-bit
    > Interleave every: 100 Milliseconds
    > Unchecked "Use MCI Recording"
4. Pilih: Record audio from microphne
5. Pilih: Enable Autopan

TOOLS
1. Pilih: Video Annotations
    > Klik Kanan -> Video Format -> Resolution = 160 x 120
    > Klik Kanan -> Edit Text: kosongkan/ hapus teks yang tertulis


This is my homework. And this is my link.
http://youtu.be/_tQPnHITP_I

Thanks,

Setting Awal Video Dokumentasi menggunakan CamStudio

Nama Ravita Eka Dewi

Berikut Link Youtube Tugas 1 Setting Awal Video Dokumentasi menggunakan CamStudio

http://www.youtube.com/watch?v=_WZubJWg7Bo&feature=youtu.be

Chhorn Bros

Thiss video can help you, how to use CamStudio Screen record and this video have two language Khmer and English.
http://www.youtube.com/watch?v=U1a07VuzbCg&feature=youtu.be
http://www.youtube.com/watch?v=tOd2AwjDm8E&feature=youtu.be

How to use CamStudio

Dear, Lecturer
Name: Deab Sina
Major: TMD D4 ITB Batch 6

========
Software:
CamStudio dan XVid Video Codec

========
--Format Video--

REGION
1. Fixed Region
    > unchecked "Fixed Top-Left Corner" & "Drag Corners to Pan"
    > Resolusi: Width x Height = 426 x 240

OPTIONS
1. Video Options
    > Compresor: Xvid MPEG-4 Codec
    > Compressor -> Configure -> Other options -> Encoder -> Unchecked "Display encoding status"
    > Uncheck: Auto Adjust
    > Set Key Frames Every = 20 frames
    > Capture Frame Every = 50 milliseconds
    > Playback Rate = 20 frames/second
2. Cursor Options
    > Cursor Display #
    > Cursor Highlight #
3. Audio Options for Microphone
    > Audio Capture #
    > Recording Format -> 11.025 kHz, mono, 8-bit
    > Interleave every: 100 Milliseconds
    > Unchecked "Use MCI Recording"
4. Pilih: Record audio from microphne
5. Pilih: Enable Autopan

TOOLS
1. Pilih: Video Annotations
    > Klik Kanan -> Video Format -> Resolution = 160 x 120
    > Klik Kanan -> Edit Text: kosongkan/ hapus teks yang tertulis


This is my homework. And this is my link. I correct it already.
http://youtu.be/PZvBXOLBiF4http://youtu.be/PZvBXOLBiF4

Thanks,

Thursday, October 18, 2012

Pengaturan standar Camstudio by Bahtiar Imran


Assalamualaikum....

Pada video tutorial kali ini,akan dibahas mengenai bagaimana cara men seting camstudio , untuk lebih jelasnya mengenai pengaturan standar camstudio ini ,,anda bisa lansung mengunjungi situs di bawah ini,,untuk lebih afdolnya,alahkah baiknya anda meninggalkan pesan untuk jadi acuan kami dalam memperbaiki kekurangan..


Link Video Tutorial Download Disini
Blog : http://www.bahtiarimran-lombokiloveyou.blogspot.com
Terima kasih by Bahtiar Imran ( TMD )

tugas camstudio dan xvid

Hari ini tgl 18 okt, kami mempelajari tentang video dokumentasi menggunakan camstudio. Kami mempelajarinya dari awal, dari penginstalan sampai bagaimana cara menggunakannya.

Untuk pengaturan pertama, buka tab Region, pilih fixed region yang mupakan pengaturan untuk sebarapa besar resolusi tampilan yang akan direkam. Hilangkan tanda centang pada Fixed Top-Left Corner & Drag Corner to Pan. Kemudian isi resolusi yang kita inginkan (yang digunakan disini adalah 426 x 240).

Kemudian masuk ke tab Option
Pilih Video Option, disini diatur compressor yang digunakan dan juga untuk mengatur keyframe.
Pilih Audio Option, disini dapat diatur format recordingnya.

Pada Option, aktifkan 'Record audio from microphone' dan 'Enable autopan'.

Untuk mengaktifkan webcam yang akan digunakan untuk merekam pemateri dapat dilakukan pada tab Tools, pilih Video Annotation.

Berikut video tutorialnya : http://www.youtube.com/watch?v=paFFkgAgRhU&feature=youtu.be


Standar Format Video menggunakan CamStudio dan Compressor Xvid

Ersus Saeful Hidayat
TMD

Software yang harus dipersiapkan dan terinstall:
- CamStudio_Setup_v2.6b_r294_(build_24Oct2010).exe
- K-Lite_Codec_Pack_930_Full.exe dan
- XVid Video Codec 1.3.2-20110601
- CyberLink YouCam 5 Deluxe v5.0.1129


1. Klik Region, lalu pilih Fixed Region...
 

Hilangkan check box pada "Fixed Top-Left Corner" dan "Drag Corners to Pan", kemudian isikan Widh (Max-1): 426 dan Height (Max-1): 240 Klik OK.

2. Klik Option, pilih Video Option.

Compressor : Xvid MPEG-4 Codec, kemudian klik Configure. Akan muncul Xvid Configuration, lalu klik Other Options...

Hilangkan check box "Display encoding status", Ok.

Dialog box Video Option, hilangkan check box Auto Adjust. Isikan Set Key Frames Every: 20 frames, Capture Frames Every: 50 milliseconds, Playback Rate: 20 frames/second. OK.
 
 3. Klik Option, pilih Cursosr Options, centang check box "Highlight Cursor", pilih Shape dan Color yang anda sukai, klik OK.


4. Klik Option, pilih Audio Option > Audio Option for microphone. Pilih Audio Capture Device : Default input device. Recording Format: 11.025 kHz, mono, 8-bit. Centang check box "Interleave every": 100 Milliseconds. Hilangkan check box "Use MCI Recording", OK.

5. Klik Option, centang "Record Audio from microphone" dan "Enable Autopan".

6. Klik Tools,  pilih Video Annotations. Klik kanan pilih Video Source: pilih video device. Klik kanan pilih Video Format, Resolution: 160x120 dan Pixel Depth (bits) and Compression: RGB 24. OK. Klik kanan pilih Edit Text dan hapus text properties.

7. Mulai merekam dengan menggunakan Video. 

Adapun penjelasan mengenai Standar Format Video mengunakan CamStudio dan Compressor Xvid klik video youtube disini.

Instalasi dan Setting CAMSTUDIO v2.6 dan Xvid

Hari ini di LAB. Komputer saya membuat video tutorial tentang instalasi  dan Setting CAMSTUDIO v2.6 dan Xvid.

How to record screen on your PC?

How to record screen on you PC?: My name is Sean Vandet, i attach file to you on 06:17pm 10/18/2012 Thank you!

Tugas Pertama, Video Tutorial Setting Dasar CamStudio vs Xvid MPEG 4


Tugas pertama kali ini adalah membuat video Tutorial Setting Dasar menggunakan aplikasi CamStudio dan Xvid. 
Aplikasi digunakan untuk mencapture dekstop berupa file video.
Pengaturan ini terdiri dari:
- Pengaturan Ukuran Layar Dekstop
- Pengaturan Video (Compresor & Kualitas)
- Pengaturan Kursor
- Pengaturan Layar menyesuaikan gerak kursor
- Pengaturan Audio dari Microphone (Input Device dan Format Recording)
- Pengaturan Penambahan Video Cam 


Tugas Perdana TMD menjelaskan standard format video menggunakan CamStudio dan compressor Xvid

Nama : Irna Ariani
Jurusan : TMD

CamStudio adalah salah satu software untuk merekam aktifitas layar desktop.

Ada beberapa hal yang perlu di perhatikan dalam menggunakan video dokumentasi khususnya pada CamStudio dan compressor Xvid. langkah pertama yang harus diperhatikan adalah

1. Install terlebih dahulu compressor Xvid

2. Kemudian install CamStudio

3. Selanjutnya installah K-Lite_Codec

kita dapat mengubah/setting ukuran pada CamStudio dengan cara klik menu "Region" pada CamStudio kemudian jika kita ingin menentukan ukuran/lebar media yang akan kita rekam pilihlah "Fixed Region". rubahlah width and height sesuai dengan yang kita inginkan, jika ingin seluruh desktop terekam maka pilihkan "Full Screen"

untuk lebih jelas cara mempergunakan dan setting CamStudio dapat di lihat pada Link berikut : http://youtu.be/5iCvqhuJwaY

Cara Menggunakan CamStudio


Seperti kegiatan rutin biasanya, ke kampus khususnya untuk belajar. Karena pagi-pagi sekali telah mengerjakan tugas maka saya pikir enak untuk belajar bahasa C di kampus nanti. Lihat kiri-kanan teman-teman yang lain sudah pada sibuk dengan kegiatan masing-masing. Entah apa yang mereka kerjakan, tapi yang pasti pada sibuk sendiri-sendiri. Begitu melihat ke arah kiri teman-teman sudah pada asyik belajar bahasa C. Jadi ingat tadi niat dari rumah ke kampus nanti mo belajar bahasa C. Searching bahan terus baca-baca dasar-dasarnya, sudah terus memutuskan untuk meminta bahan dari teman-teman lain. Alhamdulillah dikasih. Mulai belajar deh bahasa C prakteknya..

Setelah agak siang datanglah dosen yang memberikan tugas tentang CamStudio. Deadline-nya sampai jam 16.00 sore ini. Berikut hasil video yang dibuat. Tapi karena kondisi laptop yang tidak memungkinkan, audionya menjadi tidak jelas. :(

Berikut link videonya klik disini.